Friday, December 23, 2011

My Year of Simplicity 2012

I haven't decided if I'm going to make a new blog or just use this one but my lifelong BFF and I have decided that 2012 will be our year of simplicity.  I'm going to work to get all my debts paid off (or as close as I can come) while decluttering my life, organizing, simplifying and generally just reducing my overall impact on the environment that comes from "stuff."

Now don't get me wrong, I'm not going to all of a sudden go green ... the environmental comment was more from my friend Barbie who lives in California and is into the green movement but she does have a point ... I need to consider the impact of what I do.

For example, a trip to Hobby Lobby (now as everyone knows, I'm a Hobby Lobby addict so this is just a quick example but you could substitute Walmart or any other place you go regularly) would be broken down into the following:
  • Paper/time to print out the 40% off coupon or figure out what's on sale that week (we do get a coupon in our Saturday newspaper but I never think to cut out the coupon and it's easier to print one out).
  • Time to actually go there (15 miles 1 way).
  • Gas to get there (15 miles 1 way).
  • Time spent looking at all the stuff, finding what I want and then waiting to check out (our HL is quite slow and it usually takes more time to check out than it does to shop.)
  • Emotional impact of having a bunch of craft stuff or decorative stuff that I really don't need.
  • Money spent even with coupons on stuff to make more stuff.
  • Time spent on pinterest to find more ideas and make the return trip to HL.
With a little creativity (and less pinterest), I probably could save a lot of time, money and frustration by just cutting out a trip or 2 to Hobby Lobby every week.  This of course would mean I'd have to actually PLAN my Christmas gifts next year which I've decided will be purchased at the Hy-Vee gift card kiosk and my entire Christmas shopping will take 5 minutes.

Looking forward to seeing how the year of simplifying goes ... who's with me?

Wednesday, December 14, 2011

Scrabble Art

So I caved into the lure of Scrabble tile art on pinterest and am making little framed sayings for stocking stuffer gifts.  I've done a love you, getting ready to do a best friend and might have to figure out something beer-related for my son who is getting big into home brewing.  There's a world of possibilities, I tell you!

I spent over an hour at Hobby Lobby with my little tiles trying to find the right frames, opening them up and making sure I could close them again with the tiles.  I found a 5 x 5 for the LOVE YOU, a 5 x 7 for the BEST FRIEND and lo and behold yesterday I found an 8 x 8 scrapbook frame that might work for the beer (or another one I'm trying to figure out).  A thrift store Scrabble game + 50% off scrapbook paper (not that I don't have enough around here anyway) + 50% frames = kind of a cool little extra gift.

Gotta love pinterest! 

PS:  Bella the Beagle was quite impressed!  :)

PSS:  On a roll here!  *lol*


Tuesday, November 8, 2011

Wreath Mania

Oooh I'm so addicted to pinterest.com it isn't funny!  I think I've spent the last week, every day, in Hobby Lobby! 

First I decided to make the Eddie Ross (eddieross.com) ornament wreath.  A couple years ago I attempted to make one using vintage glass ornaments (scored from the thrift stores) and used a fake pine wreath, ornaments and hot glue.  It was a disaster!  Half the ornaments broke, the branches wouldn't cooperate and it was horrible.  Sadly I sold all the remaining ornaments at a yard sale (got ripped off by a buyer too but that's another story) and gave up.  Then I found this one!  It looked way too easy but I decided to try anyway.  I don't normally like plastic but went with plastic because I'm going to hang this on the outside of my door and with the cold/ice/snow/wind we get here in Nebraska, I had visions of shattered glass ornaments everywhere.  I hit up Hobby Lobby and bought one of the big packages of shatterproof ornaments and then hit up Dollar Tree for more when I ran out.  The ones at DT are smaller and I bought too many (DT doesn't take returns so be aware of that!) but will give them to a friend for her to make one of these.

Instead of using a coat hanger, I went with a Dollar Tree 18" wreath.  I took all the greenery off it and was left with a simple round wire circle.  However, we did have a problem when we tried to connect it because it wouldn't solder and we ended up using duck tape (again, glad I used plastic ornaments).  The bow is some DT ribbon (2 spools) and I made it using my Bowdabra.  I was hoping that Salvation Army would still have the EZ Bowmaker they had for ages but it was gone.  Oh well.  I think it turned out pretty cool.


The fall wreath was another pinterest idea.  I didn't replicate it exactly but it's good enough for me.  The "F" is for my last name and I'm now officially on a 2-week (or more) Hobby Lobby diet. 


My front door loves me! 


Friday, October 21, 2011

Halloween Wreath of Craptastic Fantasticness ...

Lately I've been addicted to pinterest.com which is a total time sucking fantastic site that has billions of ideas for anything you could ever want.  Since I rarely decorate for any holidays other than Christmas, I decided I better do something for Halloween besides just sticking a pumpkin out front.  (Last year I didn't even do that, I found some gourds growing in a ditch ... yes I'm in a rural area ... and stuck them in a huge basket on the front porch but some guy mowed the ditch this year so I was stuck.)

Anyway, I debated on making a tulle wreath or a feather boa wreath and since the tulle was cheaper than the boas and I only had 1 40% off coupon for Hobby Lobby, I decided to make a tulle wreath. 

I bought a 14 inch styrofoam wreath (not in the floral section but back with the styrofoam stuff ... way cheaper than the green floral wreaths!!) ... bought 3 spools of black tulle, bought a package of small orange ornaments and a cute little "trick or treat" sign.  All bought at Hobby Lobby and everything was on sale but the styrofoam wreath so I used the coupon on that.  Woo hoo!

I cut the tulle into equal lengths (didn't measure with a measuring tape but I assume about 14 inches) and tied them onto the wreath form.  I used about 2-1/2 spools of tulle.  Then I attached the little hanging sign at the bottom, hot glued and tied 3 orange Christmas balls on the side and painted polka dots on them and then I attached a length of orangey fall ribbon to add some color.  I think I'm going back to Hobby Lobby tomorrow to get the polka dot ribbon they had since I think that will look better but for now, oh well.

This is going on my front door.  I still need a pumpkin though!  :)

Thursday, October 13, 2011

Another Altered Train Case

I love making these for some reason ... it's just relaxing!  Found this poor little case at Salvation Army for $1.99.  It was a mess, the whole interior was ripped out so I decided to see what I could do to rescue it.

I used Mod Podge and scrapbook paper to cover the interior and exterior and then I painted the bottom and handle pink with acrylic paint.  I used sticky glue dots to attach the scrabble tile letters, K & Company flowers and then I attached squares cut out of The Paper Studio "Yarn & Thread Emporium" card stock pack that I got at Hobby Lobby. 

I then coated the whole thing with water based varathane to seal it and harden it ... I find this works better than Mod Podge over the top although I do use Mod Podge first, let that dry and then use the varathane. 

I'm probably going to use this to store my crafty stuff.  Still need to seal the "squares" since I just put those on today but wanted to shoot some quick pictures and put them up here while it's drying.  :)


Tuesday, September 20, 2011

For Barbie's Golden Jubilee (50th Birthday)

So my best friend in the entire world is turning 50 next month!  She's calling it her Golden Jubilee so I wanted to add some gold to her celebration and decided to make her a Hershey kiss rose bouquet, in gold of course. 

I searched all over and couldn't find gold cellophane and the only Hershey's kisses that were gold were almond so I settled on yellow cellophane and plain kisses.  I wrapped 50 of these using cellophane, bamboo skewers, floral tape and silk leaves.

I painted a bucket I got from Hobby Lobby metallic gold, put a circle of floral styrofoam inside and stuck the kisses in that.  Then I bought some metallic gold crinkle stuff to cover the skewers and used rectangles of gold glittered tulle as accents.  I wrapped a big tulle bow around it and needing something a little extra, I found a bow gold glittered Christmas ornament at Hobby Lobby which I stuck to the bow with a sticky glue dot.  I think it turned out fairly cool.

I prefer the mixed candy bouquets myself (like the one in a previous post that I made for my daughter's speech competition) but since I wanted this to be obviously gold, went with just the kisses.  She loves chocolate and yellow roses so it's a double yay.

I also picked up several glittered gold ornaments at Hobby Lobby (I should probably just get a job there, I'm at HL all the time) including a golden crown and golden carriage (like in Cinderella). 

I'm also knitting her a set of Halloween dishcloths that she requested and am adding a few extra goodies to her package like candles, etc.  Hopefully she likes it!

Tuesday, August 30, 2011

Goodbye to Vintage Camping & Some Advice

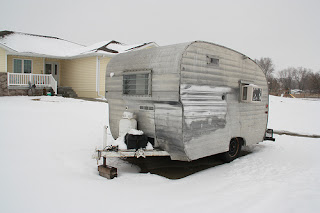
Well I've sold the Shasta and have given up on the Forester so am saying good bye to vintage camping. 

Some advice for anyone considering getting into this ... please please please, take the time to think about what you're getting into before you hand over your hard earned cash.  Check every inch of the camper and if there is any evidence of mice or major water damage (not just along the windows but on the floor of the potty closet, under the carpet, etc) WALK AWAY! 

Do NOT even consider buying something that needs work (even if your spouse says it will be fun) unless you (or your s/o or spouse) know this is something you can and will accomplish.  Set a timeline for getting the projects done and don't allow procrastination.  Find out how much it will cost to rebuild your camper and make sure you have a backup plan if your spouse drops the ball and 6 months after gutting your camper, you're still stuck with nothing but loose wires that go nowhere and a Menard's bill.

Don't be swayed by cute ... cute is irrelevant in the long run.  I was swayed by cute and a husband who said he could/would be able to fix up my camper and even though I knew I should have walked away ... even though I knew the camper was a piece of crap and I was handing over way too much money because it was a cute, tiny canned ham (what I was looking for), I ended up bringing it home and now it's just a costly piece of junk cluttering up whichever space it's parked in at the moment. 

I am out about $5000 because I thought Sisters on the Fly would be fun and vintage camping was just so darling ... I ended up taking a big loss when I sold camper #1, camper #2 collapsed on the drive home and is nothing but a chassis and camper #3, while still cute, is a gutted piece of aluminum. 

Be sure also that your state will allow you to title a camper if the seller doesn't have one.  Nebraska won't allow you to title a camper on just a bill of sale.  Fortunately for us camper #2 collapsed before we had put a bunch of work and money into it, we couldn't have gotten it titled/registered anyway.

I guess in hindsight, I'd suggest doing a lot of research and soul searching before you decide this is for you.  I should have realized it wasn't for me.  I'm not a rough & tumble cowgirl, I dislike horses, dirt, bugs and charity work (unless it's for one of the charities that is near and dear to my heart), I don't fly fish, I don't cook over a campfire (unless it's hot dogs and s'mores) and I like having a flush toilet, running water and a shower. 

I'm not saying don't do it ... it might be just your thing ... just please do your research beforehand.  There are a ton of great resources out there and you CAN walk away even if you've driven 4+ hours 1 way to see a camper that had been "stored inside, was pristine and in awesome condition and had never had mice or water damage."  Riiiiiiiiight.  There's a sucker born every minute and it was my time.

Thanks for following and reading my blog.  Sorry I don't have more to offer!

Tuesday, May 31, 2011

Grrr ... Blogger won't let me comment!

Not sure what's going on but I can't seem to comment on any blog posts ... I'm reading all of you, just can't say anything back.

I comment, choose google account, sign in, put in the weird little word and then it takes me back to log-in and we do this dance again and again and again.

Anyone else having this problem? 

Sunday, May 22, 2011

Progress on the Forester

Today we replaced the window screws.  Didn't replace the butyl tape since the windows were tight against the skin and my philosophy is "if it ain't broke, don't fix it."  Used some clear sealant, putting a drop in each screw hole before screwing in a new screw. 

Then we continued working on replacing the rotted framing, putting in new pine "studs" where there were rotted pieces and weak areas.  Lots of measure, measure and cut since hubby is of the mindset "measure twice, cut once."

It's slow going but he said once this nitpicky stuff is done, the rest should be easier.  It's just time consuming replacing little pieces of wood, especially where the roof curves are.

I need to order some window seal stuff from vintage trailer supply and go over to where we stored Compact parts and see if I have a window that will fit where the a/c currently is.  We're also looking at replacing a board on the underside near the skin and possibly just redoing the entire door.

Too soon to think about camper colors and color schemes for the outside but hopefully soon we can get to the "fun" stuff. 

Wednesday, May 18, 2011

Visits

Well we survived graduation and out of state visitors and I just might have hooked my sister on the vintage camper craze!  Company arrived last Friday and of course, after the house tour, they had to take a tour of the 2 campers.  They were more impressed with the LoFlyte naturally since it's intact and decorated and couldn't believe how tiny the Forester is ... they of course saw it in its gutted glory so it will look even tinier once it's rebuilt!  Such slow going on that since hubby has too many irons in the fire but one day!

My sister was thrilled with how cute vintage campers are and so I gave her my Sisters on the Fly book for her trip home and now she's trying to get her friends involved and I predict within a year she'll have found a vintage camper of her own.  I did find a 1970 Frolic for sale in Norfolk but knew she wouldn't be able to take it on the plane ... it was just funny to find something right after she expressed an interest.

As many of you know, I belong to the Vintage Shasta Trailer Forum and one of the other members is in Nebraska on a road trip to pick up a Shasta Compact.  She's planning on driving up here so we can meet & greet ... what fun! 

It was so nice to be able to meet Mindy and see her darling little compact.  Even our dogs got along great ... camper folks are the neatest!
For those of you who are thinking about getting into vintage camping, watch out, you better get moving.  Oprah featured Sisters on the Fly in her new magazine so everyone will be snapping up these little gems .... be quick but be careful!

Wednesday, May 4, 2011

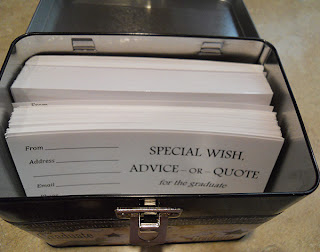
Advice for the Graduate Decoupage File Box

When my son graduated years ago, I ordered an "advice for the graduate" jar where guests at his reception would post messages on scraps of paper and put them in the jar.  Since my daughter is graduating, I wanted something similar but couldn't find anything I really liked.  I saw several altered Rolodexes and card files on Etsy but they all were for weddings and showers.  I actually asked a seller if she would be willing to sell just the cards with "graduate" instead of "bride and groom" but never heard back from her so decided to create my own.

I decided to go with a file box but finding the right one was a challenge.  Hobby Lobby didn't have anything that would fit 4 x 6 or 3 x 5 cards so I went over to Office Max.  They had the perfect little tins!  They hold 3 x 5 file cards and come in black or white and actually have a closure on them.  I bought 2 of them and some blank 3 x 5 cards and set out to create a cute little box.

I used scrapbook paper from Hobby Lobby and using Mod Podge, decoupaged it to the box.  Then using Microsoft Word, I was able to recreate the advice cards only in 3 x 5 format.  Figuring out how to print them was also a challenge ... it took me a while to feed them into the manual feed of my HP Laserjet 3050 all-in-one but finally I located the manual feed and by printing 10 at a time (the max it will do), I got a bunch of cards printed up.

All in all, I'm pleased with the results.  I debated putting a bow and charms (grad hat and 2011) on top but decided to go with more of a minimalist approach.  I'm planning on doing another one for my Sisters on the Fly table for the sisters that go to the events I go to to leave their contact information.  Haven't found the perfect paper for that yet but I'm looking.


Monday, April 18, 2011

Pictures of the Gutted Forester

Here's what we're looking at as far as a blank canvas.  Not quite sure what we're going to do with the floor heater.  First off, we've disconnected the propane and I'm not overly comfortable using gas inside a small space anyway.  The floor is original tile but in the front, it's pretty cracked so we'll probably replace that with laminate or maybe vinyl, just not sticky back tile .. I hate that stuff.  As far as the rest, who knows.  First step will be replacing the rotted framing wood, checking for leaks and then using rigid insulation to insulate.  After that, the sky's the limit!  Now if only it would stop raining!


Saturday, April 16, 2011

Gutting the Forester

Well the lil Forester canned ham is gutted ... we had a break in the weather today so decided to do some work and completely cleaned her out.  All the paneling is removed, all the "innards" are removed and I removed all the fiberglass insulation before quitting for the day.  She's down to windows, floor, framing studs and skin.  It's odd how roomy she looks without all the stuff inside. 

We did find some rotted framework which will have to be replaced but for the most part, the wood is intact.  There are some random nail/screw holes that will be sealed and unfortunately there are some places where we can see daylight on the edges through the floor.  Hubby says he has a plan to fix that so I'll just have to leave that up to him.

When I ripped out the insulation, 90% of it was dry and clean so that was a good sign, a lot less water rot than I was dreading.  I just can't wait to get the rotted wood cleaned out and replaced so we can start designing the interior and get on with the fun stuff.  Can you tell I'm impatient?

Word to the wise though ... if you're not patient, capable or interested in fixing, save your $$ to find a pristine already restored camper.  Some days I wish I had adhered to that advice myself!  It would have caused a lot less stress.  But this is fun, right?

Monday, April 11, 2011

Wasps Nests, Wood Rot and Leaks, Oh My!

Boy hubby sure wanted something to keep him awake yesterday (it was prom Saturday night and he worked post-prom until 5:00 a.m. and then slept till 10).  He kicked butt on the Forester and pretty much completely gutted her.  Lots of clean up which I'll probably attempt to do later today but most of the inside is ripped out.

All in all it was in pretty good (dry) shape except for the kitchenette area.  Once the stove was out we found what we were hoping not to find and that was wet, rotted wood!  :(  The whole area below the front window will need to be re-framed but we first need to find the source of the leak and patch it.  I don't see anything right off the bat except maybe it came in from the 2 vents ... heck I don't know. 

We also found a ton of wasps nests behind the paneling in the walls ... how could someone camp with all that buzzing?  These were old and dead by the time we got to them but there were mud wasp nests and paper wasp nests ... yikes!  Ignorance was probably bliss at one time! 

Once we get this all cleaned out, then we're going to try to figure out a game plan for the restoration.  I'm debating whether or not to put a little dinette in the front instead of the kitchenette area.  Where the 2 closets were along the street side wall, that might end up being the kitchenette section since I don't really need a clothes closet and a port-a-potty closet and would much rather trade that room for a small one-seat on each side dinette.  We'll see.  We're definitely going to put a twin bed along the back wall horizontally for more room. 

This is the fun part ... trying to figure all this out.  I can't wait!


Friday, April 8, 2011

Prom Time!

Well tomorrow is our school's prom .. my daughter is a senior so this is her last hurrah.  She's "prom royalty" which is kind of exciting and we will find out tomorrow night who gets crowned king and queen.  This is actually her 2nd prom in 2 weeks, yikes!

Anyway, being as she's the "spontaneous" type (meaning she doesn't tell me stuff until the last minute), she informed me last evening that all the senior girls are wearing garters.  So I called all over the place looking for a black or a silver garter.  All sold out ... ugh.  We went to the bridal shop (actually 2 of them) to see what they did have and she didn't like any of them.  We went to Hobby Lobby.  She didn't like any of them.  Then she said "Mom you can make me one!"  WHAT?

So we bought ribbon, we bought elastic, we bought sequins, we bought a 2011 charm ... I went back today and bought more ribbon to try to figure out how in the heck to make a garter.  None of the you-tube videos worked so I just decided to piece this thing together.

The base ribbon is a pleated black satin with a net background that she picked.  Then I fabric glued a row of silver sequins along the center of that. (Her dress is black/white/silver sequins.)  Then I hand sewed some black/white ribbon along the back to make a casing for the elastic and ran elastic through the back to gather it up.  I sewed the opening closed, made a decorative bow to hide the seam out of some narrow white/silver organza ribbon and sewed a "2011" charm below it.

She said it works ... I guess that means it's not an epic fail.  Now I'm ready to start working on my camper damn it!  At least a little bit before graduation next month!  :)

Sunday, April 3, 2011

Discoveries inside "The Burrow"

After consulting the wonderful folks at the Vintage Shasta Trailer Forum (http://vintageshasta.proboards.com/), we've decided to attempt a skin-on restoration of the Forester rather than taking the skin off as we initially thought we'd have to.  I'm happy because I honestly didn't want to try taking the skin off this thing if we didn't have to and to find out it's doable is fantastic.  We worked all day yesterday trying to get the camper into the garage and there's no way it's gonna fit so a skin-off restoration would be a disaster here in Nebraska with the crazy wind and weather fluctuations.

Today hubby found a multi-tool thing at Menard's (miniature electric saw with other accessories) and went to work cutting the paneling so it can be removed.  He took off part of the ceiling in the vent area and the curbside wall and we were pleasantly surprised to find that the wood supports/studs weren't rotted.  Also the fiberglass insulation, while the backing had stains, was intact and dry.  I was afraid we'd find wet, blackened, moldy insulation so finding nice clean yellow insulation behind the paper backing was a plus.  We're going to remove that and replace it with the rigid insulation anyway but in my opinion, any sign that points to NO water rotting is a good sign.  I'm most worried about the porta-potty closet wall (street side) and I'm sure in there we're going to find all kinds of disgusting things but if 90% of this thing is intact, I'll be a happy camper.

Also, we pulled up the disgusting carpet and found tile!  This was kind of exciting to me because I remember my parents house having that same basic tile (not sure what it's called) and my sister and I spraying it with silicon spray and "ice skating" in our socks all around the house.  Yes, I know that's crazy and we're lucky to not have broken bones but it was kind of a fun find for me.  The stuff toward the back of the camper is slippery and looks to be in excellent condition.  The stuff toward the front near the door and in front of the kitchenette has some crazing/surface cracks but I won't be able to tell how bad it is until I remove all the disintegrated carpet backing that has left a nice yellow dust all over the floor.  Ideally, if it's in decent enough shape, I plan to leave the floor tile but if not, I guess I'll stick some kind of laminate flooring over it.  We'll see.

It's supposed to snow (AGAIN) tomorrow and the temperature dropped drastically while we were out there this evening so that kind of stinks.  Now that we've made some progress, I'm anxious for warm weather and a less hectic schedule so we can get this thing in motion! 

Oh, one of the things we found yesterday was a gray water tank mounted under the camper.  I didn't know it even had that.  My Shasta just has an opening where you hook up a hose and drain it into a plastic tub so this was another one of those "cool finds" in my camper world anyway.

Now if only I could find a US equivalent of a baby Belling cooker http://www.belling.co.uk/baby-belling I'd be even happier! 

Monday, March 28, 2011

Snow Snow Go Away!

Sheesh, hasn't the snow heard it's supposed to stop toward the end of March?  I'm dying to start on the Forester but with this snow, it's just not going to happen.  Maybe this weekend!

Meanwhile I'm working frantically on catching up the "Senior Year" scrapbook in time for graduation.  Hard to believe it's only 1-1/2 months away!  Where has the time gone?  I'm ready to get this thing done so I can cull through my scrapbook hoard and get rid of stuff that I'll never use again!  I plan on donating it to the school for use in speech visual aids, etc. 

In fact, with the snow and cold weather, I probably should clean out my craft closet ... hmmm ... sounds like a plan!  Hurry spring!

Friday, March 11, 2011

1961 Forester Ideas and Photos

Finally got around to taking multiple pictures of my new project ... a 1961 Forester camper called "The Burrow."  We've decided to completely redo the interior since there's evidence of some neglect for lack of a more appropriate term.  The seller wasn't 100% truthful but when you fall in love, you tend to overlook the flaws for the beauty you see inside which is what happened here.  In all honesty, we probably should have walked away from this little gal and I think we knew that when we inspected her but being that we know how hard it is to find a little compact canned ham around here and the fact that the aluminum skin seems solid from all our poking and prodding we decided to take on the challenge of an internal restoration.

We learned from our mistakes with the 1968 Shasta Compact last year and knew to look for evidence of skin damage, collapsing walls, etc. and we didn't find that.  She towed home just fine and so that's a good sign.

Our plans are to reconfigure the inside by making a twin-size bed against the back wall.  The camper itself inside is 75 inches across so we can fit a mattress on the bed with no problem.  We'll extend out 40 inches for the actual bed section and then butted up against that on both sides will be two 18" x 18" benches.  Seeing as how the measurement from the back of the camper to the wardrobe closet (street side) is 58 inches, we're doing good with that plan.  On the curb side directly across from the wardrobe there used to be a waist high cabinet that was removed for some reason so we will replace that as well.

The porta-potty closet will likely remain the same size but I might use part of it for storage with shelves in the back.  The kitchen area cabinets will be redone and along the back and side walls, I plan on putting shelves with a decorative lip to keep stuff from sliding off when she's parked.

The outside will get a good polishing with Mother's Mag Polish and she will be shiny and bright when I get through with her.

The current flooring is unknown underneath some ratty carpet but I'm thinking of laminate flooring unless I decide to go with a vinyl.  Whatever I use will have to be somewhat heat resistant since there is a floor heater built into the actual floor of the camper.  I'm not sure why the decided to do that, it seems to me that inadvertently stepping on a hot grate at night would cause massive screaming and jumping around but I can't find any information on this old camper which leads me to believe either it's a rare jewel or the idea just didn't take off for Forest City Ind. Inc. of Forest City, Iowa.  If anyone has any information, I'd love to hear about it!


Sunday, March 6, 2011

The Burrow

I've really been wanting a small compact-size canned ham camper and finally found one!  I picked this one up today ... she's gonna need some work inside and out (lots of polishing, major cleaning and some wood working) but in the end I think she's gonna be worth it.

Of course, I have to name my camper, being a proper Sister on the Fly, so decided to name her "The Burrow."  For those of you who aren't aware, The Burrow is the Weasley's house in the Harry Potter series.  I'm a huge Harry Potter fan and the name just seemed to fit. 

I plan on doing her up in an English country cottage theme and can't wait to get started.  Hurry up spring!!

Saturday, February 26, 2011

Rosebuds and Chocolate - Edible Bouquet

A friend of mine will be celebrating a milestone birthday soon so I wanted to do something different for her.  I decided to combine 2 personal favorites, roses and chocolate, and I made her 40 Hershey's Kiss roses and put them in a personalized planter that I painted and Mod Podged.  This was super easy and I have another occasion coming up that I'll be making a candy bouquet for since I think this one turned out cute.

I used a plain old terra cotta pot, painted black and using my Cricut I cut out "40" with fancy scrapbook paper.  Then I decoupaged the "40" onto the pot and let it dry.  I found a styrofoam ball at Michael's that fit inside the pot and using BBQ skewers, floral tape, silk leaves, red cellophane and Kisses, I went to work. 

To make the roses, put 2 kisses flat end together in the center of a square of cellophane (about 4-5 inches big).  Stick the skewer in the center of the bottom kiss and twist the cellophane to hold it tight.  Then wrap tightly with floral tape, wrapping the stem of a leaf about 1/4 way down or so (it's crafts, not science so whatever you think looks good works).  Continue wrapping skewer with floral tape to the bottom, cut and twist the end up to stick to the bottom floral tape.  Voila ... you now have an edible rosebud.

I didn't want the styrofoam ball to show so I used paper crinkle from Hobby Lobby to cover it but there you have it ... a cute, edible bouquet to celebrate just about anything! 

Have fun!

PS:  The very first one of these I made years ago, I used floral wire so if you have that lying around, you could use that but I prefer the skewers since they seem to be more sturdy.

PSS:  The second one in purple is one I made this morning for my daughter for district speech which is coming up in a few weeks.  Hope she makes it to state! 


Sunday, February 20, 2011

How NOT to Buy a Camper!

Even though I have a perfectly good Shasta LoFlyte (decorated even), I've always been in love with the little canned ham shaped campers from the 50s.  I've drooled over pictures and have broken the 10th commandment multiple times but they're just so darn cute, I can't help myself.

Anyway, I digress.  We decided yesterday to go prom dress shopping which naturally meant a trip to the "Big City."  Since the main highway was closed due to water over the road, we had to take a meandering secondary path to get there.  Now honestly, usually I'm bored to tears and have my eyes closed because there really isn't anything to see around here especially in the winter.  All of a sudden, my husband said "did you see that little camper back there?"  I quickly sat up in my seat, turned my head to see it and missed it.  So we decided to go back for a drive by.  There is was ... THE camper!  The only one I've ever seen around here ... the one I want ... the "cheese to my macaroni" as my daughter would say, sitting there in an overgrown yard filled with abandoned cars, other trailers and assorted junk and a boarded up house.

So we stopped at the neighbor's house to ask about it.  She said the house wasn't inhabited and the guy just left all his junk there.  She also gave us his son's name because she said no one was ever around and that would be our best bet.  We thanked her and I decided it wouldn't hurt to go take a peek at this little darling just to make sure she wasn't destroyed before we bothered some strange guy on a weekend.  After traipsing through mud (and almost falling on my butt a few times) we found a rutted path near a cornfield and walked down it to take a quick look at the camper.  It was adorable ... 50's birch interior, 99.9% intact windows, some water damage but looked like it had potential.  The "I wants" quickly multiplied in my head and so we decided to go back to the car and call the guy when we could find a phone book for the area.

In order to avoid the mud, we decided to walk along the highway.  Meanwhile, some guy is trailing us which kind of creeped me out but figured we were close to the car so could easily make a run for it if he was up to no good.  Well he stopped and yelled at my husband to "get the f**k out."  My husband calmly went over to talk to him and explain that we were just interested in looking at the little camper and had gotten the information from the neighbor about who to call.  Turns out, it was the long-lost owner of the property (cue Deliverance music here) who just happened to be driving by and was itching for a fight.  He cussed, he yelled, and bottom line told my husband "if the *$%&$ camper was for sale, it would be out front with a for sign on it."

Now maybe, just maybe, we were wrong to wander onto some obviously abandoned property to take a quick look at an abandoned camper ... but honestly, people do this all the time.  I just was interested but the guy obviously would rather see this little darling sit and rot rather than making some money and seeing her restored to her full potential.

I'm still looking ... anyone know of an inexpensive canned ham camper for sale?  Cheap?

Thursday, February 17, 2011

Speech Team Good Luck Cupcakes!

I made these for the speech team kids for their meet tomorrow.  I'm taking a cake decorating class so learned how to make the fancy icing swirls using the 1M tip.  The picks were made using lollipop sticks and scrapbook paper.  I printed out circles in Word with Good Luck on them, punched them out with my 1" paper punch and then using the Cricut and Accent Essentials, I used the flower shape (using the shift key to make it solid) and made 2" flowers with the printed paper and 1-1/2" flowers with the purple paper.  I then attached the Good Luck circles to the front and hot glued them to lollipop sticks.  The cupcake papers also have multicolored dots on them and since one of our school colors is purple, I colored the icing a light purple ... would hate for the kids to perform with purple lips and tongues!  :)

This was fun ... hopefully they'll enjoy them and my daughter brings home gold! 

Saturday, February 12, 2011

Banana Split Cupcakes!!

I was in a baking mood so grabbed Taste of Home Cupcakes! from the library.  Decided to make the "Chocolate Banana Split Cupcakes" and they are delicious!!  Very easy to make too ... the surprise is a square of chocolate inside the cupcake.  I couldn't find fresh maraschino cherries with stems so settled for the jarred ones. 

So many recipes in that book look amazing ... good thing I have a high schooler and her friends along with neighbor kids to give them to ... don't want to gain a ton of weight before summer!

Monday, February 7, 2011

Shabby Chic-ish Decoupaged Vintage Train Case

I really like the way this one turned out except for the obvious line on the back side where I screwed up and didn't match the patterns.  An easier way would have been just to have the line on the bottom but by the time I figured that out, it was already stuck on.  Oh well, live and learn.

I used assorted scrapbook papers from Hobby Lobby with this one.  I also spray painted it with Rustoleum Americana spray paint in Heirloom White but I don't recommend this at all.  The Krylon I used on the last case was fine.  The Rustoleum didn't stick, stayed tacky and peeled off so I slapped a couple coats of Mod Podge over the top and called it "shabby chic".  It's all good!

I haven't done the inside of this yet.  I did rip out all the plastic lining and will spray paint it with the Heirloom White because I know that will stick to the wood interior.  Then I might line it with scrapbook paper or leave it depending on what it looks like. 

This is a very addicting hobby!  I'm loving how these turnout and actually this one is more my taste than the paisley one.


Sunday, February 6, 2011

Cookies!

I promised my daughter's ex-boyfriend homemade cookies at the next speech meet and needed something to put them in rather than just a plate.  I bought a package of the plain white gift bags at Hobby Lobby (at 50% off ... yay!) and was going to embellish them with Paper Studio "Baking" scrapbook paper but then decided that would be too "girly" and he'd probably be embarrassed. 

So, I looked through my stash and found some sandy beach paper, cut a 4-inch circle out of the sand part with the Cricut and then cut random snips (mostly trapezoid shapes) out of dark brown paper and glued them to the circle to make a chocolate chip cookie which I glued to a larger circle (4-1/4 inches using the Cricut) and glued it to the bag.  I then made just a rectangle on top of a rectangle out of the same paper and used white sticker letters to spell out cookies.

I think it turned out cute.  I'll put the cookies (chocolate chip naturally) in a Ziploc bag and nestle them into some tissue paper and call it good.  Hope he likes them!

Friday, February 4, 2011

Another Suitcase Makeover

Wow, I can tell I'm getting bored!  I redid another suitcase today using Mod Podge and some retro-licious fabric I found at Walmart.  It's called Santa Fe Paisley.  The 2 fabrics (inside and out) do coordinate and there was a third one to the set but it was brown so I decided not to get it.

I bought a vintage Samsonite suitcase with that lovely beige marble covering at Salvation Army along with a matching cosmetic case (square train case) that I haven't done anything with yet.  After removing the lining I was surprised to find that these old suitcases are actual wood inside.  Wow!  I then used Krylon spray paint in Bahama Blue and sprayed multiple coats to cover the outside. 

I was going to leave it blue and just paint dots or something on it to coordinate with the fabric and even went and painstakingly picked out coordinating colors of acrylic paint at Hobby Lobby but today decided to use the patchwork and instead just Mod Podge it to the outside.  It reminds me of those 70s patchwork hippie skirts.  I'm going to spray paint a coat of clear on top to give it a more smooth feel.  The Mod Podge did seal the fabric but it feels kind of gritty.

For the inside I cut the turquoise paisley, ironed a 1/2 inch hem around the pieces and glued them in place.  For the piece that goes over the two sides, instead of using butcher paper like the original, I just used fusible webbing and 2 scrap pieces of fabric to make it stiff and glued that into place.

I kind of like it.  My daughter said, "What are you doing this for?"  When I told her she could take the suitcase to college, she informed me she doesn't like retro so no.  That's okay, I'll use it to store my collection of vintage linens or something or maybe I'll carry it off to college myself ... just kidding.

Monday, January 17, 2011

Vintage Find for a "Fly Sister"

I'm sure I've said it many times but I love thrift stores.  You never know what you're gonna find.  I tend to do better when I'm not looking for anything in particular because when I'm looking for a specific item (ie a rolodex like the one I passed up a few months ago) I never find anything.

I wandered into Salvation Army on Friday and picked up 3 vintage Whitman books for one of my Sisters on the Fly.  I can never remember whether this particular sister likes Roy Rogers or Gene Autry (I'm thinking it's Gene) so I grabbed both and an Annie Oakley book to boot.

For 89 cents a book I got the following (pictures aren't mine, I forgot to take pictures before I boxed them up.)  They're pretty cute and will look great in her camper.